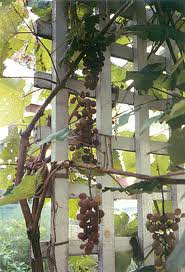
Historically trellis was used as a framework to grow an assortment of vines and flowering climbers on. The word trellis derives from the French word treillage, meaning a latticework for supporting vines.
These days trellis is used in a number of different ways, e.g. to provide screening or a windbreak, to divide an area, as well as other structural and visual functions within a garden.
Why not take a look at Jarrett Fencing’s great range of trellis, whether added to the existing fence, as a view through panel or placed above a panel it can offer support to larger plants and climbers, or be an ornamental backdrop.
With modern gardens, ever diminishing in size, the trellis becomes a firm favourite for growing cucumbers, peas, beans, tomatoes and aubergines and getting these vegetables off the ground will produce a better crop; it also protects them from insects that are in the soil. Having the fruits above ground also prevents them from rotting, by not resting on poorly drained or wet soil. In addition, of course, the ever popular use of trellis with an arbour and, or gate to give a welcome to visitors or, consider how trellis can bring further dimension to your garden.
Hi, Our administrator Janette Sibley has just informed us that she is running with her friend in the Great North Run this year, 18/9/2011 on behalf of the RNLI.
If anyone would like to help Janette and her friend Jackie to support the RNLI then go to: http://www.justgiving.com/Janette-Sibley.
Do you know it costs upwards of £1000 to provide clothing for a full crew member, his gloves and boots alone cost £16 & £42 respectively.
Many people think the RNLI is a Govt. body but far from it, we wish Janette and her friend Jackie every success in their challange.
As house, prices soared over the past twenty years how many of you had to settle for a house that only looked sizable when the doors were taken off their hinges. Many households now struggle for living space, it can lead to friction, arguments, and general discourse among the occupants, but a positive means to resolving this issue is to consider the space you have outside in the garden. Thanks to the choice of Summerhouses, cabins ,and sheds we can offer there is bound to be a solution to at least some of your discourse, be it for an office, a quiet or workroom, an office, family gatherings, a play area or for storage.
Take a look at Jarrett Fencing’s range of summerhouses, cabins, and sheds and consider how they might work for you, not forgetting that with an additional glazed room you can enjoy the wildlife in your garden all year round.
Whilst we cannot guarantee to remove your household discourse your decision in selecting the right product may well help; why not discuss your requirements and reasons for choice with our estimators.
If you live within 20 miles of Stevenage our estimators will be happy to come and visit you on site otherwise why not ring or e-mail us about utilising your garden space to best effect; we can also offer bespoke services if required.
Why not browse our extensive website and see all that we have to offer.
Every so often, customers asking fencing questions on the position, height, way of facing and boundary issues approach us; recently a lady called to ask if her neighbour was in the right by facing the raw fence panels to her land and the attractive smooth side to their own. An Internet resource provided by Jon Maynard Boundaries Ltd gives excellent advice in these matters and in this case:
There is no law that says the smooth side of the fence should face the neighbour.
If your neighbour pays for a fence that he erects on his own land (even if he builds the fence so that the outer face of it, as seen from his land, runs along the boundary) then he is entitled to choose the style and colour of the fence, as well as whether he places the smooth side of the fence to face in towards his own house or out to face your house.
Did you know there is no obligation in law to fence the boundaries of one’s land, except for Safety and there are specific laws relating to the railways, mines and quarries, Highways and animals but do take note that a conveyance deed or a transfer deed may include a covenant requiring the purchaser to fence the land and for him or his successors in title to forever maintain the fence.
A wise householder will fence his land, either for the protection of his own children, or, to prevent his pet animals from straying.
At long last we have had some rain, not a lot but it made me think, did you know we can assist in maintaining moisture in the ground by supplying you with quality Ornamental Bark; which also suppresses weeds, and our quality Soil conditioner to not only top dress the lawn but to improve the soil by breaking up clay and improving moisture retention.
When it comes to Landscaping we can supply railway sleepers, log boards, bollard timbers and edging rolls to define and improve borders, surround ponds, create raised beds etc.
Of course the garden may still benefit by screening with our panels and have you seen our composter and bin stores:
Well, we at Jarrett Fencing are well rested after three bank holidays and now summer appears to be here and it is time to ensure our gardens are tidy, to introduce colour and to ensure our garden privacy.
Are your gate/s fencing secure, do they look good, or are you hesitant about the dodgy fence post, will the gate fall off of its hinges nest time it slams, is the catch no longer holding properly?
Why not take a look at our great choice in fencing and gates, be it wooden or metal, particularly our most popular style of Tulip palisade that is on Special Offer throughout June.
Did you know that we can also offer sheds, cabins and summerhouses in many styles, as well as screening for wheelie bins, water butts and the like? We also supply garden features such as our sturdy good-looking wooden planters, for raised gardening or positioning on the patio and, or deck. See our exciting garden bridge and of course our very popular garden mirrors and mirror screen.
Finally take a look at our preservative treatments to maintain the appearance and life of your wooden fences and sheds.
The St Meloir Panel is made from planed, ‘Tanalised’, pressure impregnated treated FSC certified timber and finished in a pale green colour, with the latest generation wood preservative.
It is the most popular of all our European range of fence panels and adds elegance to any garden.
In order to protect your fence panels and add years to their life span they should be isolated from the ground by either a timber or concrete gravel board. We also offer a range of timber and concrete slotted posts that will help insulate your panels from damp.
Traditional closeboard bay fencing is built in-situ and is very strong. It is especially good for gardens with sloping ground because the fence can be erected to follow the ground contours, which means fence stepping is not needed.
The mortised posts and the gravel boards can be either timber or concrete. Traditional closeboard bay fencing with concrete mortised posts and concrete gravel boards is the strongest of domestic garden fences.
Step 1: Fixing the posts
All posts should be concreted 2ft deep in the ground using post mix, with the mortised holes in line with the boundary line.
Step 2: Fixing the arris rails
The posts have mortised holes to allow shaped arris rails to fit inside of posts.
Step 3: Fixing the gravel boards
For timber posts and gravel boards measure from the top of the post down 1.65 metres and nail the timber gravel board cleats in the centre of each post. Cut the length of the gravel board to fit between the posts and nail to the cleats.
For concrete posts and gravel boards use the 2-pin cleat kit. The cleats have two prongs on one side, which slide into the pre-drilled holes in the concrete posts, and a pre-drilled hole in the other side through which it is bolted to the concrete gravel board. The concrete gravel boards have short slots at either end to allow the bolt to pass through.
Step 4: Fixing the centre stump
For timber posts and gravel boards dig an 8-inch deep hole in the centre of the fence bay and insert the centre stump with the angled top facing up to fit under the bottom arris rail. Back fill earth around the stump and nail the timber gravel board to the stump.
For concrete posts and gravel boards dig a 8-inch deep hole in the centre the of fence bay, in line with the pre-drilled hole in the concrete gravel board, and insert the centre stump with the angled top facing up to fit under the bottom arris rail. Back fill earth around the stump and bolt the concrete gravel board to the stump through the pre-drilled hole.
Step 5: Fixing the featheredge boards
Starting from the left of the fence bay sit the first featheredge board on top of the gravel board, with the fat edge towards the post, and nail it to the arris rails. Take the second board, overlap it by one inch on the first board – again with the fat edge towards the post – and nail it to the arris rails. Repeat until the bay is complete, always with the fat edge towards the post and the thin edge overlapping by one inch.
A step-by-step guide to installing panel fencing on timber or concrete posts.
Tools Required
String line
Spirit level
Hammer
Grafter or spade
Shovel holer
Tape measure
Saw
Fixings Required
Panel clips
40mm galvanised nails
Step 1
Ensure the area is clear from obstructions such as old fence posts, bushes, or anything that may interfere with the new fence line.
Step 2
Check all underground services. The area must be clear of pipes and cables for at least two feet underground. Erect the string line to mark the fence boundary. Step 4 - Digging a two foot deep holeStep 5 - Putting a post inStep 6 - Attaching panel clips
Step 3
Select your concrete or timber post.
Step 4
Dig a two foot deep hole and insert post.
Step 5
Ensure that the post is the correct height for the fence, allowing for gravel boards if used. Use a spirit level to make sure the post is upright. Put ‘Rapid Set Post Kwik’ into the hole, add the correct amount of water and mix.
Step 6
Concrete slotted posts do not require panel clips. For wooden posts attach the panel clips to the posts and then fix the panels to the clips. Keep a spirit level on top of the panel to make sure the fence remains level on top.
Step 7
Repeat steps 4, 5 and 6 until all your panels are installed. The last panel may need to be reduced in width to finish off the gap. This can be done with a handsaw.
A place for garden and fencing news, ideas and advice from the Jarrett Fencing team. To start things off, here is a link to our guide to Choosing Fence Panels.
 Historically trellis was used as a framework to grow an assortment of vines and flowering climbers on. The word trellis derives from the French word treillage, meaning a latticework for supporting vines.

 tomatoes and aubergines and getting these vegetables off the ground will produce a better crop; it also protects them from insects that are in the soil. Having the fruits above ground also prevents them from rotting, by not resting on poorly drained or wet soil.
 In addition, of course, the ever popular use of trellis with an arbour and, or gate to give a welcome to visitors or, consider how trellis can bring further dimension to your garden.
 Hi, Our administrator Janette Sibley has just informed us that she is running with her friend in the Great North Run this year, 18/9/2011 on behalf of the RNLI.

 As house, prices soared over the past twenty years how many of you had to settle for a house that only looked sizable when the doors were taken off their hinges. Many households now struggle for living space, it can lead to friction, arguments, and general discourse among the occupants, but a positive means to resolving this issue is to consider the space you have outside in the garden.
  Thanks to the choice of Summerhouses, cabins ,and sheds we can offer there is bound to be a solution to at least some of your discourse, be it for an office, a quiet or workroom, an office, family gatherings, a play area or for storage.
 Every so often, customers asking fencing questions on the position, height, way of facing and boundary issues approach us; recently a lady called to ask if her neighbour was in the right by facing the raw fence panels to her land and the attractive smooth side to their own. An Internet resource provided by Jon Maynard Boundaries Ltd gives excellent advice in these matters and in this case:


 Well, we at Jarrett Fencing are well rested after three bank holidays and now summer appears to be here and it is time to ensure our gardens are tidy, to introduce colour and to ensure our garden privacy.
 Our
Our 


